Every photo app on a phone has an Enhance button now and every one of them calls it AI. The gallery app, Snapseed, Remini, the web ones, even the ones that run inside the browser tab and never upload anything. So which part of that is AI, right? Most of it is not. Most Enhance buttons run three functions that OpenCV has shipped since 2006, and the apps that do run a model are doing something very different from the apps that don’t, which matters a lot if the photo has text on it, a box with 128GB printed on the side, a logo on the back of a phone.
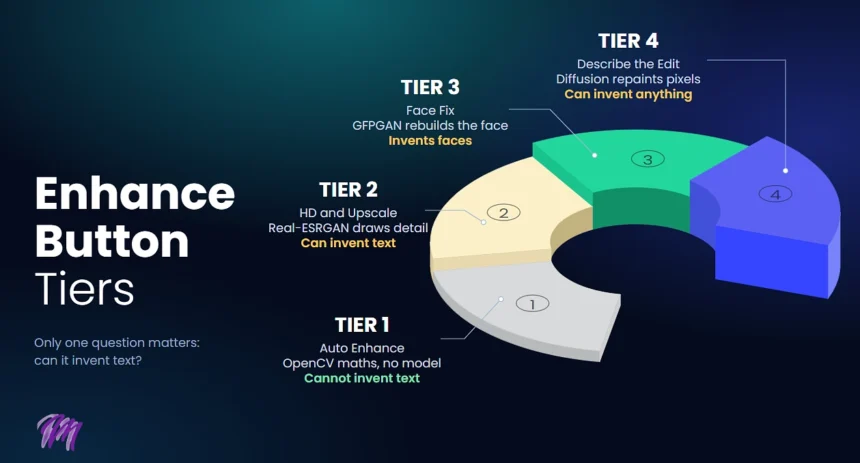
Here is the whole thing split into four tiers. Which library runs, the pip command, what it does to the pixels, and the one question that decides whether your listing photo can come back with a product on it that doesn’t exist.
Tier 1: Auto Enhance
The button in the gallery app, the one-tap fix in Snapseed, the “Enhance” on most free web editors. You tap it, the dull photo pops, shadows open up, edges look crisper. No upload bar, no spinner longer than a second.
This is not a model. It is four old operations run in a row, and the better web tools say so on their own FAQ pages, a light denoise, auto-contrast, a small brightness lift, and a sharpen.
- Auto levels. Find the darkest and brightest pixel, stretch everything between them to 0 and 255. Pillow
ImageOps.autocontrast(). That is the “flat photo gets punch” part. - CLAHE. Contrast Limited Adaptive Histogram Equalization. The image is cut into tiles, each tile’s contrast is stretched on its own, with a clip so noise doesn’t blow up. This is the one that makes a dim room look lit. OpenCV
cv2.createCLAHE(clipLimit=2.0, tileGridSize=(8,8)). Uploadcare, a real CDN, names CLAHE as the whole technology behind its Enhance feature. - Unsharp mask. Blur a copy of the image, subtract it from the original, add the difference back. Edges get a halo of contrast and read as sharper. Nothing new is drawn. Pillow
ImageFilter.UnsharpMask(radius=1.5, percent=180). One enhancer site publishes exactly those numbers. - Saturation bump. Convert to HSV, multiply S by 1.1 or so, convert back. Pillow
ImageEnhance.Color(img).enhance(1.15). - Denoise.
cv2.fastNlMeansDenoisingColored(). Smooths grain, usually run first so the sharpen after doesn’t sharpen the grain.
pip install opencv-python pillow and you have all five. Some of these apps don’t even go that far, they run it in the browser with the Canvas API, the photo never leaves the device, and the word AI is on the button anyway. No issue and no harm in it, the result is fine. Just know what you pressed.
What Tier 1 can do to text on a box: nothing. It can only push pixels that are already there up or down. A soft “128GB” stays a soft 128GB with more contrast. It cannot become 256GB, there is no mechanism for that.
Tier 2: HD and Upscale
The “HD” button, “4K”, “Upscale”, “Unblur”. The photo gets bigger, or stays the same size and gets detail it didn’t have. There is an upload, a spinner of five to thirty seconds, often a credit charge.
This is a model. Real-ESRGAN is the one most of the web tools and a lot of the apps run, SwinIR is the other common one. It is a neural net trained on pairs of small and large images, and when you give it a small one it draws what a large one would probably look like. Draws. The detail is predicted, not recovered.
- Real-ESRGAN.
pip install realesrgan, plus one model file,RealESRGAN_x4plus.pth, about 65 MB. Runs on CPU slowly, GPU fast. - What it does. Takes a 500 px photo, outputs 2000 px, fills the new pixels with texture it learned from training data. Brick looks like brick, skin like skin, fabric like fabric.
- Where it goes wrong. Text. A blurry “128GB” is blurry because the camera didn’t capture it. The model doesn’t know what it said, so it draws the most text-like thing it can. Sometimes that is 128GB. Sometimes it is 126GB, or 12B6B, confidently, with sharp edges.
The honest enhancer sites put the line right where it belongs: sharpening cannot recover detail that was never captured, the upscaler is the one that actually adds detail, using machine learning to add realistic detail. Realistic is the word to watch. Realistic is not the same as real.
So Tier 2 is the first tier where the badge on the box can change. It won’t add a camera lens, that’s not what it was trained to do, but it will absolutely sharpen a soft number into a wrong number.
Tier 3: Face Fix
Remini is the whole business model for this tier. “Enhance” in Remini, “Face restore” in half the web tools, the thing that takes a 2009 phone photo of your dad and gives you a sharp face.
- GFPGAN and CodeFormer are the two models.
pip install gfpgan, one model file. CodeFormer is a separate repo. Both are trained only on faces, tens of thousands of them. - What it does. Finds the face, cuts it out, rebuilds it at high resolution from what a face usually looks like, pastes it back. Eyes, teeth, skin pores, all generated.
- What that means. The result is a plausible face, a good-looking one, and it is not necessarily the person’s face. Jaw a bit narrower, eyes a bit more symmetrical, the mole gone. People notice on their own family and don’t notice on strangers.
Tier 3 does nothing to a product photo unless there is a face in it, in which case it will quietly improve the face. For listing photos this tier is irrelevant, for profile photos it is the tier people mean when they say the app made them look like someone else.
Tier 4: Describe the Edit
A text box. “Remove the background”, “make it a studio shot”, “cleaner glass, fewer fingerprints”. You type what you want and the app repaints. This is diffusion, Stable Diffusion, Flux, the Nano Banana class of model, running image-to-image or inpainting.
- What runs. A diffusion model takes your photo, adds noise to the region it’s going to change, then denoises it back guided by your sentence.
pip install diffusersgets you the open ones, the commercial editors call an API. - What it does. Generates. Not adjusts, not sharpens, generates. Every pixel in the edited region is new.
- What it can change. Anything. Text, logos, the number of camera lenses, the colour name on the box. If the prompt says “cleaner bezel” and the model’s idea of a clean bezel has a longer model string on it, you get a longer model string.
An AI Photo Editor with a describe-the-change box is Tier 4 by definition, PicEditor says so on its own page, upload the still, type the change, generate. That is the right tool when you want the background gone or the lighting changed, because the first three tiers cannot do either. It is also the only tier where the sealed box under the counter and the photo in the listing can stop agreeing, so the check after generate is not optional here the way it is optional on Tier 1. Read the model line on the source, read it on the output, count the lenses. If anything moved the file does not go in the gallery.
So the logic is, Tier 4 is the most powerful and the least trustworthy with facts, and that is not a flaw, it is what generating means.
Which Tier Is Your App On
You can tell without reading any code. Four tells:
- Speed and upload. Instant with no upload is Tier 1, it ran in the browser or on the phone. A spinner and an upload is a model, Tier 2 or up.
- Does it ask for a face. If the feature only works when a face is detected, or the marketing is all before-and-after portraits, Tier 3.
- Is there a text box. A prompt box is Tier 4, every time. No Tier 1 to 3 operation takes a sentence.
- Does the output get bigger. If the pixel dimensions went up, Tier 2 ran somewhere, even if the app calls it Enhance.
Most apps stack them, so one app can sit on two or three tiers depending on which button you press.
| App or button | Tier 1 Auto Enhance | Tier 2 HD / Upscale | Tier 3 Face Fix | Tier 4 Describe the Edit | What it means for a listing photo |
|---|---|---|---|---|---|
| Gallery app on a budget Android | Yes | No | No | No | Safest button on the phone, text cannot change |
| Google Photos Enhance | Yes, plus learned tone curves | No | No | No | Safe, colours may shift a touch |
| Snapseed one-tap | Yes | No | No | No | Safe |
| Free “AI Enhance” web tools | Yes | Upsell, paid HD button | Sometimes | No | Safe until you press HD |
| Remini | No | Yes | Yes | No | Box text can sharpen into a wrong number |
| PicEditor prompt box | Yes, sliders alongside | Yes | No | Yes | Anything can change, check the box after |
Read the last column before the first one. The apps with the most buttons are the ones where a listing photo needs the side-by-side afterwards, and the dumbest button on the phone is the one that cannot lie about a badge.
Doing Tier 1 Yourself in Python
Twelve lines, so you can see how small it is. This is roughly what the one-tap Enhance runs, and it never touches a letter.
pip install opencv-python pillow numpy
import cv2, numpy as np
from PIL import Image, ImageOps, ImageEnhance, ImageFilter

img = cv2.imread("listing.jpg")
img = cv2.fastNlMeansDenoisingColored(img, None, 5, 5, 7, 21)   # denoise first

lab = cv2.cvtColor(img, cv2.COLOR_BGR2LAB)
l, a, b = cv2.split(lab)
l = cv2.createCLAHE(clipLimit=2.0, tileGridSize=(8, 8)).apply(l)  # local contrast on lightness only
img = cv2.cvtColor(cv2.merge((l, a, b)), cv2.COLOR_LAB2BGR)

pil = Image.fromarray(cv2.cvtColor(img, cv2.COLOR_BGR2RGB))
pil = ImageOps.autocontrast(pil, cutoff=1)                        # auto levels
pil = ImageEnhance.Color(pil).enhance(1.12)                       # small saturation lift
pil = pil.filter(ImageFilter.UnsharpMask(radius=1.5, percent=180, threshold=3))
pil.save("listing_enhanced.jpg", quality=92)
Run it on a listing photo and put it next to the app’s Enhance output. On most phone shots you won’t tell them apart. The CLAHE on the L channel only is the trick, run it on all three channels and the colours shift.
Go as per your ease on which tier you use, the point is to know which one you pressed. Tier 1 for a listing photo with text on it. Tier 2 when the photo is small and the text doesn’t matter or isn’t there. Tier 4 when you need something that isn’t in the photo at all, with the box check after. And the word AI on the button tells you nothing about which of those just ran.