Hey mates! Are you apple user you use iPhone or Mac and Wondering how to record secreen on your Mac? I’m here to guide you on how to achieve that while capturing both video and audio seamlessly. So, let’s dive into how to screen record on your Mac with audio.
Screen recording is excellent for making a tutorial or demo to show others how to do something on their Mac. It’s also handy for recording gameplay footage if you’re a streamer or content creator. And, of course, it can be useful for showing someone an issue you’re having with a program – seeing and hearing exactly what’s happening makes troubleshooting way easier.
In this short guide, we’ll quickly go over how to screen record on your Mac with audio. There are several ways to do this, but we’ll concentrate on the easiest method using the tools already built into your Mac. Ready to start? Let’s get going!
Understanding Screen Recording on Mac
Screen Record on Mac with Audio is really useful because it lets you capture everything happening on your display and system audio all at once and save it as a video file. This makes it easy to create tutorial videos that teach people how to use apps and software, showcase new features or workflows, document processes, and troubleshoot bugs or issues by showing exactly what’s occurring on your screen. Game streamers can also use screen recording to capture their gameplay and commentary to share. So, in any situation where showing what’s happening on your Mac could be helpful, screen recording is an invaluable tool in your back pocket. Now, let’s look at how you can record your screen and Audio on a Mac.
Basic Terminology for Screen Recording
Screen Record on Mac with Audio involves capturing and saving everything that happens on your screen. It’s like creating a video of your actions. To make it work, you should know a few terms:
- Screen Recording: This is simply recording what’s on your screen. It’s great for demos, tutorials, or reporting issues.
- Audio Recording: This captures sound from your Mac or external sources like microphones. Useful when explaining or guiding in videos.
- Frame Rate: Consider how many pictures appear in one second of your video. More frames per second (fps) make things smoother, but need more power.
- Resolution: It’s about how many pixels you see on the screen. Higher resolutions (like 1080p or 4K) mean more explicit recordings but demand more processing and storage.
Preparing Your Mac for Screen Recording
Before you begin Screen Record on Mac with Audio, it’s essential to check if your system meets the requirements and that your audio settings are set up correctly. Screen recording on a Mac can be valuable for capturing and sharing digital activities, whether for tutorials, gaming, or showcasing software features. Proper preparation ensures that your recordings are smooth and of high quality.
Checking System Requirements
Before commencing screen recording on your Mac, follow these steps to ensure a smooth experience:
- Check Your Mac Model: Confirm that your Mac is compatible with screen recording. Different models have varying capabilities, so knowing if your Mac can handle this function is essential.
- Update Your Operating System: Ensure that your Mac is running the latest operating system version. Software updates often bring improvements and optimizations that enhance the screen recording process.
- Assess Storage Space: Screen recordings can consume much disk space, especially for lengthy videos or high-resolution content. Check your available storage capacity and free up space if needed to prevent interruptions due to insufficient storage.
Configuring Audio Settings
To include Audio in your screen recordings and ensure accurate synchronization with visuals, follow these steps to configure your audio settings:
- Access System Preferences: Open System Preferences on your Mac.
- Click on “Sound”: Within System Preferences, locate and click on the “Sound” icon.
- Adjust Audio Options: You can make various audio-related adjustments in the Sound preferences window.
- Select Input and Output Devices: Choose the input and output devices according to your recording needs. To record system audio, ensure the appropriate output device is selected. This captures sounds like music, system alerts, and application audio.
- External Microphone: If you plan to use an external microphone, ensure it’s properly connected to your Mac and selected as the input device in the Sound preferences. This provides a clear capture of external Audio, including your voice.
- Advanced Setup: Consider recording a combination of system audio and external microphone input for more advanced configurations. This is useful for providing commentary or narration alongside on-screen demonstrations.
- Double-Check Settings: Double-check your audio settings to ensure everything is correctly configured before you start screen recording.
With these steps, your audio settings will be ready for Screen Record on Mac with Audio, allowing you to capture visuals and sound effectively.
Using Built-in Tools for Screen Recording:
You can quickly record your screen on a Mac using several built-in features without any additional software. We have listed three options: SurFlex Screen Recorder, QuickTime Player and Zoom.
1. SurFlex Screen Recorder For Screen Recording
Using the SurFlex Screen Recorder for Screen Recording in Steps:
1: Install and Launch
- Download and install SurFlex Screen Recorder on your Mac.
- Open the app once the installation is done.
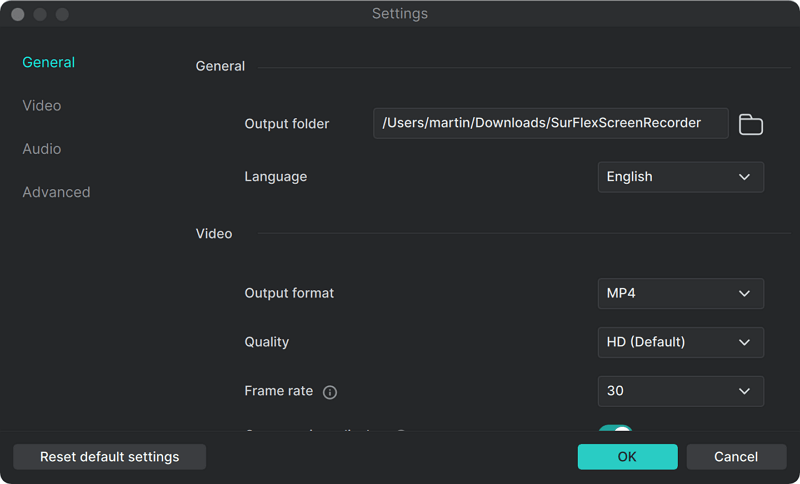
2: Configure Settings
- Inside SurFlex Screen Recorder, click “Settings” to set up your preferences.
3: Choose Recording
- Select your recording area:
- “Record Screen” for the entire screen.
- “Record Webcam” for webcam footage.
- Use “Record Audio” to record the system’s audio and the microphone.
4: Set Audio Options
- In case you choose “Record Audio,” change the audio settings.
- Pick your microphone and fine-tune audio inputs as needed.
5: Start Recording
- Click “REC” when ready to begin recording both video and Audio.
6: Capture Your Content
- Perform your actions, whether it’s presentations or gaming.
7: Pause and Resume (Optional)
- Pause or resume the recording using the provided controls.
8: Stop and Review
- Hit “Stop” when you’re done.
- Review your recording in a popup window to ensure everything looks good.
9: Save and Share
- Save your recording in your preferred video format (MP4, WMV, AVI, MOV, etc.).
- Share it or use it as needed.
That’s it! You’ve successfully screen recorded on your Mac with Audio using SurFlex Screen Recorder. This user-friendly guide should help you effortlessly capture high-quality video and Audio from your Mac screen.
2. QuickTime Player for Screen Recording
Using QuickTime Player for Screen Recording in Steps:
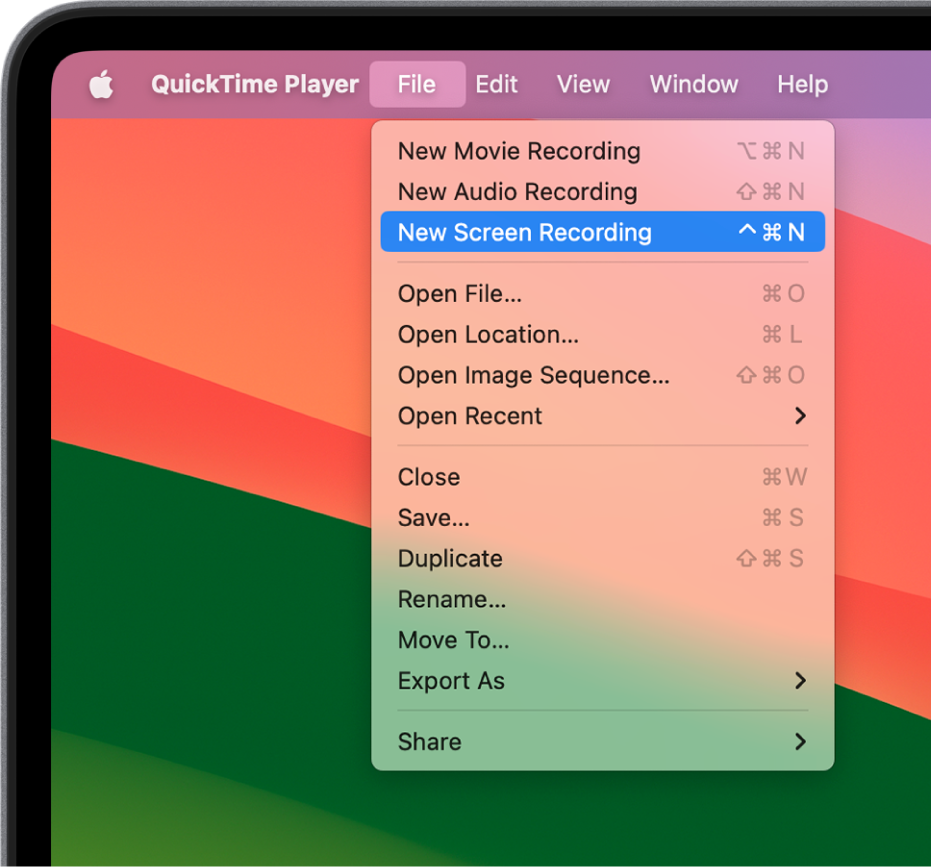
- Launch QuickTime Player: Open QuickTime Player, a default application on your Mac. You can find it in your Applications folder or use the Spotlight search.
- Access Screen Recording: After opening QuickTime Player, go to the menu bar and click on “File.” A dropdown menu will appear. Go to this menu and choose “New Screen Recording.”
- Configure Recording Settings: A small recording window will appear on your screen. Here, you can customize your recording settings. Choose your audio source, select the screen portion to record, or enable mouse click highlighting, as needed.
- Initiate Recording: Once your settings are configured, click the red “Record” button to start the screen recording. Proceed with demonstrating the actions or steps you wish to capture.
- End the Recording: To stop the recording, click the “Stop” button in the menu bar or simultaneously press the “Command + Control + Esc” keys.
- Preview and Edit: After finishing the screen recording, you can preview and edit the video within QuickTime Player. Trim unwanted sections, add annotations or captions, and choose various export formats for easy sharing or further editing.
Following these steps, you can effectively use QuickTime Player for Screen Record on Mac with Audio for various purposes.
3. Screenshot Toolbar for Screen Recording

Using the Screenshot Toolbar for Screen Recording in Steps:
- Access Screenshot Toolbar: On macOS Mojave and later versions, press Shift + Command + 5 on your keyboard to open the Screenshot Toolbar. It appears at the bottom of your screen, offering screenshots and screen recording options.
- Choose Screen Recording: Within the Screenshot Toolbar, click on the screen recording icon to start the recording process.
- Customize Recording Settings: A control panel will appear, allowing you to set your recording preferences. Select whether you want to record the entire screen, a specific portion, or a particular window. You can also turn microphone audio on or off and choose whether to show or hide mouse clicks.
- Initiate Recording: After configuring your settings, click the “Record” button to begin recording your screen. Proceed with your actions or demonstrations.
- End the Recording: To stop the recording, click the stop button in the menu bar or simultaneously press “Command + Control + Esc.”
- Access Recorded File: The Screenshot Toolbar will automatically save the video to your location once the screen recording is finished. You can access, view, edit, or share the recording.
Both QuickTime Player and the Screenshot Toolbar offer convenient methods for screen recording on your Mac. Whether you prefer QuickTime Player’s versatility or the simplicity of the Screenshot Toolbar, these built-in tools ensure a smooth experience for capturing and sharing your screen activities.
#4 Zoom For Mac
If you are the host:
- Open the Zoom app and start a meeting.
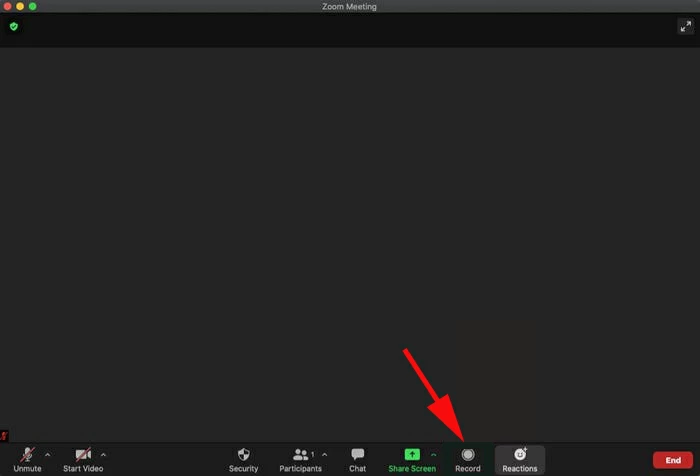
- Click the “Record” button at the bottom of the Zoom window.
- Select “Record on this Computer” to save the recording locally on your Mac.
- When you are done, click the “Stop Recording” button.
- The recording will be saved as an MP4 video file in your Zoom recordings folder.
Note you can just open Zoom app don’t need to invite anyone just start the meeting and start screen recording as per your need.
If you are a participant:
- Ask the host for permission to record the meeting.
- If the host grants permission, you will see a “Record” button in your Zoom window.
- Click the “Record” button and select “Record on this Computer.”
- When finished, click “Stop Recording.”
- The video will save to your Zoom recordings folder as an MP4 file.
Step-by-Step Guide to Screen Recording on Mac
Let’s get started with a thorough step-by-step tutorial now that you have a solid understanding of screen recording on Mac and the tools that are accessible.
A significant tool for collecting and distributing content on a Mac is screen recording. Knowing how to use the screen recording feature to provide tutorials, capture gaming, or save significant moments. In this article, we will walk you through starting a Screen Record on Mac with Audio, choosing a recording region, and controlling audio sources.
Initiating Screen Recording
- Choose Your Recording Tool: Open your preferred screen recording tool, QuickTime Player or the Screenshot Toolbar.
- QuickTime Player: If using QuickTime Player, go to the menu bar, click on “File,” and select “New Screen Recording.”
- Screenshot Toolbar: If using the Screenshot Toolbar, press Shift + Command + 5 on your keyboard and select the screen recording icon.
- Access the Recording Interface: A recording window or toolbar will appear on your screen.
- Start Recording: Click the “Record” button within the recording window or toolbar to begin your screen recording.
You’re Ready: Once you’ve initiated the screen recording, you’re all set for the next steps.
Selecting the Recording Area
To select the area of your screen for recording, follow these steps:
- Position the Recording Window or Toolbar: Arrange the recording window or toolbar to your desired location on the screen.
- Adjust Size and Shape: Resize the recording area by dragging its edges or corners, customizing it to your preferred size and shape.
- Reposition the Recording Window: Click and drag the recording window to move it to the ideal position on the screen.
- Verify Content: Ensure the content you want to capture is within the selected recording area.
By following these steps, you can precisely choose the portion of your screen to focus on during the recording, whether it’s a specific application window, a designated area, or the entire screen.
Managing Audio during Screen Recording
To include Audio in your screen recording, follow these steps to ensure the correct audio sources are selected:
- Access Audio Settings: Click on the volume icon in your menu bar and choose your preferred audio input and output devices.
- For QuickTime Player Users: If you’re using QuickTime Player, click the small arrow next to the record button and select your desired audio sources.
- For Screenshot Toolbar Users: If you prefer the Screenshot Toolbar, click the options button and choose the audio sources under the “Options” tab.
By managing your audio sources using these steps, you can ensure that the Audio captured in your screen recording is clear and perfectly synchronized with the visual content.
Screen Record on Mac with Audio offers many possibilities, whether you’re a content creator, educator, or simply looking to preserve memorable moments. This step-by-step guide equips you with the knowledge to initiate screen recording, select the recording area, and manage audio sources. So, unleash your creativity and start recording with confidence.
Saving and Editing Your Screen Recording
It’s time to save your screen recording after you’re done and modify it. The first step to ensure you can access and share your screen recording later is to keep it. Editing your screen recording can also help you improve the content, eliminate extraneous material, or add annotations to help the audience comprehend.
How to Save Your Screen Recording
To save your screen recording, follow these steps:
For QuickTime Player Users:
- Access the Menu Bar: In QuickTime Player, click “File” in the menu bar.
- Select “Save”: Choose the “Save” option from the dropdown menu. This action ensures that your screen recording is securely stored on your device.
For Screenshot Toolbar Users:
- Automatic Saving: If you use the Screenshot Toolbar, the screen recording will automatically be saved to your desktop. No manual saving is required, simplifying the process.
Typical Steps for Both:
- Name and Location: After selecting your preferred saving method, it’s time to personalize your file. Choose a name that suits your recording and specify the location where you want to save it.
- Click “Save”: Once you’ve named your recording and determined the appropriate storage location, click the “Save” button to complete the saving process.
- Following these steps ensures that your screen recording is saved with a name and in a location that makes it easy to access and organize as needed.
Basic Editing Techniques for Screen Recordings
To enhance your screen recording, consider making basic edits using these techniques:
1. Use Video Editing Software:
- Explore video editing software like iMovie, Adobe Premiere Pro, or Final Cut Pro.
- Sync your screen capture with the program of your choice.
- Utilize features such as trimming, transitions, text overlays, and more to refine your recording.
2. Trim Unwanted Portions:
- Trim your screen recording to remove unnecessary sections like pauses, mistakes, or irrelevant content.
- This creates a more concise and engaging video.
3. Add Annotations:
- Enhance your recording with graphics like text boxes, arrows, circles, or other visuals.
- Annotations provide additional context and highlight critical areas for better viewer understanding.
4. Adjust Audio:
- Fine-tune audio aspects, such as volume levels, background noise removal, or background music addition.
- Ensure professional sound quality and an immersive viewing experience.
These techniques are a starting point for improving your screen recording. Depending on your preferences, you can explore further editing options and experiment with different effects to create a standout recording.
Troubleshooting Common Issues
While screen recording on your Mac is usually straightforward, you might encounter some common issues. Here are some advice for troubleshooting:
Resolving Audio Problems
If you encounter audio problems while recording your screen, here’s what you can do: First, ensure you’ve chosen the correct audio input and output devices in your settings. If the issue persists, try restarting your Mac and then attempt the recording.
Dealing with Screen Recording Errors
If you run into any errors or technical glitches while recording your screen, here’s what you can do: First, try restarting the screen recording tool.That doesn’t work, consider updating your operating system. If the issue persists, you can also explore using a different screen recording tool as an alternative.
Tips for Effective Screen Recording
Now that you’ve understood how to Screen Record on Mac with Audio let’s delve into some helpful tips to make your recordings even better.
Enhancing Video Quality
For the best video quality, consider these tips:
- Good Lighting: Record in a well-lit area to prevent dim or grainy footage.
- Resolution and Frame Rate: Opt for a higher resolution and frame rate for smoother and sharper recordings.
- Audio Quality: Reduce background noise to enhance the audio quality of your recordings.
Optimizing Audio for Screen Recordings
To optimize audio quality in your screen recordings, consider these techniques:
- External Microphone: Use an external microphone for clearer Audio.
- Microphone Placement: Position the microphone near your mouth to minimize background noise.
- Audio Testing: Before beginning your screen recording, check and adjust audio levels to ensure they are well-balanced and precise.
Screen Record on Mac with Audio offers numerous opportunities for content creation and effective communication. You can create professional and captivating screen recordings by following this step-by-step guide and implementing these best practices. Whether you’re an educator, gamer, or tech enthusiast, the ability to screen record on Mac with high-quality Audio will become an invaluable tool in your digital toolbox. So, power up your Mac, prepare to hit that record button, and start sharing your ideas with the world!
Conclusion
In our modern digital world, visual content in the form of videos can be much more engaging and effective for communication than static images or text. Screen Record on Mac with Audio provides a great way to create dynamic video content to convey your message, whether you’re a teacher demonstrating a concept, a content creator producing tutorials, a customer support rep documenting an issue, or anyone else looking to share information and ideas through the power of video. With screen recording capabilities built right into Macs, capturing high-quality videos of what’s happening on your screen is easy. Gaining expertise in “How to Screen Record on Mac with Audio” is a key digital skill in our modern era. The process is simple at its core, but it’s the little intricacies that elevate the standard of your recordings. Utilising the built-in functionalities of macOS, you can effortlessly record, polish, and share the happenings on your screen. It’s vital to remember that the success of captivating screen recording hinges on careful planning, clear communication, and adept post-recording edits. Whether you’re preparing instructional content, showcasing a demonstration, or producing entertainment, employing these guidelines and insights is essential for developing content that not only engages but also deeply resonates with your viewers.
FAQs:
MacOS has built-in tools, such as QuickTime Player and the Screenshot Toolbar, which facilitate screen recording without extra software.
Absolutely. Both QuickTime Player and the Screenshot Toolbar allow for audio recording, enabling you to capture or narrate alongside your screen activity.
By default, screen recordings are saved to your desktop on macOS. However, you can choose a different location when saving your file after recording.
This could be due to incorrect audio input settings. Ensure you’ve selected the proper audio source and check the volume settings before recording.
While macOS allows for basic trimming, you might need to use dedicated video editing software like iMovie for more comprehensive editing features.
Ensure that your Mac is running optimally—close unnecessary applications to free up resources and consider lowering the screen resolution for a smoother recording experience.
The Screenshot Toolbar in macOS lets you show mouse clicks in your recording. You can enable this feature in the options before you start recording.
Yes, macOS allows you to drag and select the portion of the screen you wish to record, providing flexibility in what content gets captured.
You can start a screen recording using the Screenshot Toolbar by pressing Shift + Command + 5 on your keyboard.
Screen recordings on macOS are typically saved in the. MOV format is versatile and widely compatible for viewing and editing purposes.